Revlon Shape N Buff Nail Buffer

Revlon Shape N Buff Review

I bought this 4 way buffer at Wal-Mart for roughly $3.46. The four steps are:

  1. Even Out
  2. Smooth
  3. Buff
  4. Shine

Revlon Shape N Buff Nail Buffer

Revlon Shape N Buff Nail Buffer

The first step “Even Out” works fine. I was able to get rid of the ridges on my fingernails. Step two, the “Smooth” step also worked well enough. I ran into problems with the “Buff” step, step 3. So this is supposed to prepare your nails for the final “Shine” step. I couldn’t get the fine scratches worked out of my nails. I followed the instructions which say to use the tool in one direction. The reason, they say, is to lessen the possibility of your nails cracking and peeling. Even after I did step 4, “Shine”, I still had fine scratches in my nails. I couldn’t seem to achieve a high gloss shine like I can with a less expensive 3 way buffer.

The thickness of this buffer was also a problem for me. I’ve use thinner buffers with great results. I’m able to get the thinner buffers all around the curve of my nail without much effort since they will bend a little bit. The Revlon Shape-N-Buff is too thick to bend.

I did try to use the coarse and fine grit emery boards (the black and white sides) on the Shape-N-Buff but because of the thickness of this buffer I really couldn’t use them effectively. In all fairness, I do keep my fingernails fairly short so someone with longer fingernails or acrylics should be able to use the emery board part without much problem.

The emery boards did interfere with buffing my nails. I found myself scratching up my nails while I was trying to smooth and shine them if I wasn’t really careful. So, Revlon Smooth-N-Shine? No, thanks. I’ll stick to my cheap emery boards and 3 way buffer.

I purchased this nail buffer with ny own funds.

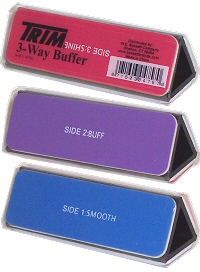
Trim 3 Way Nail Buffer

Trim 3-Way Buffer Review

I bought this 3 way buffer at Wal-Mart for 97 cents. The three steps are:

  1. Smooth
  2. Buff
  3. Shine

Trim 3 Way Nail Buffer

Trim 3 Way Nail Buffer

The three boards are afixed to a hard plastic triangle – equilateral triangle to be exact. Each step is printed right on each board so you know the order to use the boards in.

After the problems I had with the Revlon Shape-N-Buff, I was a bit wary of using this buffer. I figured since this buffer wasn’t flexible, I probably wouldn’t get a good result.

Well, I was totally wrong! I smoothed my nails with the “Smooth” step and “Buffed” and “Shined” them. The boards on the hard plastic triangle are soft enough to curve a little around my fingernails. I also didn’t have a problem with an adjacent buffer interfering with the step I was working on. The best part of all was I got a high glossy shine on my nails. The shine is so amazing it’s almost like looking at glass – so smooth and shiny. I keep staring at my nails – a 97 cent buffer working this well! Huh.

If you are looking are a nail buffer I highly recommend the Trim 3-Way Buffer.

I purchased this nail buffer with my own funds.

Wet N Wild Rock Solid Nail Lacquer

Wet N Wild Rock Solid Nail Lacquer Review

This is another inexpensive nail polish from Wet N Wild. This nail polish is “infused with micro fine diamond flecks for rock solid strength and platinum performance”. Ok, so I suppose this nail polish is supposed to stay chip free longer than regular polish.

Wet N Wild Rock Solid Nail Lacquer

Wet N Wild Rock Solid Nail Lacquer

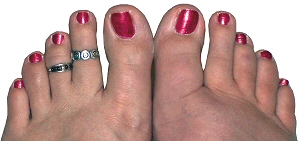
To test this nail polish, I applied two coats onto my toe nails. I didn’t use a base coat or top coat – just the nail polish. I chose color # 225 called Quartz of Course to try out. The polish went on nicely and is fairly sparkly.

After one week, the nail polish hadn’t chipped at all. See the picture on the right. After two weeks I had a bunch of chipping on my toe nails. Since I live in Florida, I do wear flip flops most of the time. If you wear shoes like sneakers or pumps you may see different results. I would definitely buy more colors of this nail polish.

I purchased this nail polish with my own funds.